
this is the easiest tutorial ever in my blog. it contains only 6 steps to complete the whole tutorial
here we go!
Step 1
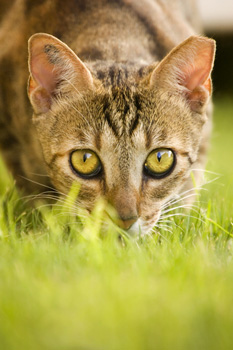
Open a photo to edit.
Step 2
Follow the steps below according to the version of Photoshop you're using:
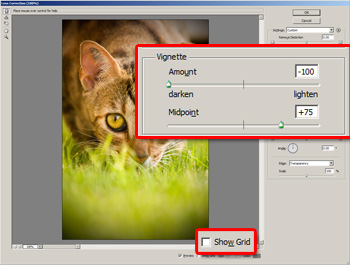
For Photoshop CS2 or newer :- Choose Filter> Distort> Lens Correction.
- Inside the Lens Correction filter, adjust the settings in the Vignette section to create the vignette.
For Photoshop CS or older :
- Create a new layer and select the new layer.
- Use the Lasso tool and create an oval selection. It doesn't have to be perfect.
- Inverse the selection (Select> Inverse or Shift+Ctrl+I).
- Press Shift+Backspace to open the Fill tool. In the Fill tool, set the contents to Black and click OK.
- Deselect (Select> Deselect or Ctrl+D).
- Open the Gaussian Blur filter tool (Filter> Blur> Gaussian Blur). In the Gaussian Blur window, ensure that the Preview checkbox is checked and adjust the Radius to blur the edges so that a vignette is created.
- Reduce the opacity a little. An opacity around 75% should produce good results.
Step 3
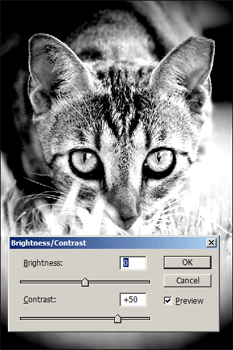
Inside the Channels pallet (Window> Channels), select the red channel.

Step 4
With the red channel selected, use the Brightness/Contrast tool (Image> Adjustments> Brightness/Contrast) and increase the contrast. The higher you set the contrast, the stronger the color effect will be. I found that increasing the contrast by 50 produced the most realistic results.
Step 5
Now select the green channel and use the Brightness/Contrast tool (Image> Adjustments> Brightness/Contrast) to increase the contrast by the same amount you did in the previous step.
undefined
Select back the RGB channel (CTRLl+~) to view the final results.
Final Result


![[My1.JPG]](https://blogger.googleusercontent.com/img/b/R29vZ2xl/AVvXsEgtjsWNYE8jTmyqvCLt9296HVomQKuxd4A52nqu_VEngKIUgnH1XDkVML_zAW_1rfq3BnaG5nPeaplK08d2SguT5tz9JVqH1vdTm3MJtja_syfRCa10HP8mpKiOmaPUgPC8_XR_gHmPJN0/s1600/My1.JPG)
Wah, look so simple to do only wo @_@
ReplyDeletenice tutorial :D
yeah!! it's simple only...i'm not dare to post some advanced level cause it take me few pages on my blog...=P
ReplyDeletenice photo edit la..
ReplyDeletei found that step 3-6 is very useful. Thanks for the tip! Looking fwd to see more from u! :D
ReplyDeletePeace
The CleverMunkey
nice tip... upgrade my ps level, tq!
ReplyDeletenanged u. Have u tried mouse noodles? haven't? nang & try it now!
nice.. thanks for the tips.. =)
ReplyDeletehaha u found my trick! lol
ReplyDeletenice tutorial btw =)
so cool of this edit lor..no nid buy lomo camera le..wakaka
ReplyDeleteclick sony eric
thx guys!! hop u all like it! i'll post more on photo effects
ReplyDeletei just love editing photos to..but im not good in photoshop..still learning..n thnx 4 the brief tutorial ya..it helps..hehe..:-)
ReplyDeletehehe tyty for posting this up.. :)
ReplyDelete